Tuesday, October 22, 2013

Quick Halloween Treat Jar


   I have been working diligently on my Halloween cards, but the project stalled a bit when I thought that I was out of black cardstock for the card base.  I thought I was going to have to go to the store to get more, and pick up some envelopes as well. I took another look through my stash, and lo and behold, there was half a pack of black cardstock and several black cards with matching envelopes, which must have been left over from the first time I made Halloween cards (eight years ago). I also found a whole stack of envelopes left over from the wedding invitations and other projects. 

I felt like yelling "It's working! It's working!" like Anakin in Episode I when the pod finally works.   Finish projects, use stuff up, and share with friends - the three main ideas behind the 40 by 41 challenge for myself.

Since I've been working on the cards and want to finish them up by the weekend, I wanted to do a  quick project that has been in the back of my mind for awhile.  Last year, I made Pistachio Cranberry cookies for Christmas that are fantastic (I could have eaten the whole bowl of batter). I bought the pistachios at Target and they came in a jar that was too handy to just recycle. It's been hanging out in the crafting oasis waiting for the right opportunity.

While looking through my Halloween paper to find the right ones for the card, I came across a candy pattern with lots of glitter that was just the right thing for a treat jar. I chose green and orange papers to accent, and I would finally get to use these adorable chalkboard stickers from K and Company, also purchased at Target (do you see a pattern forming there?)  Add some orange ribbon, and I had my materials.

 
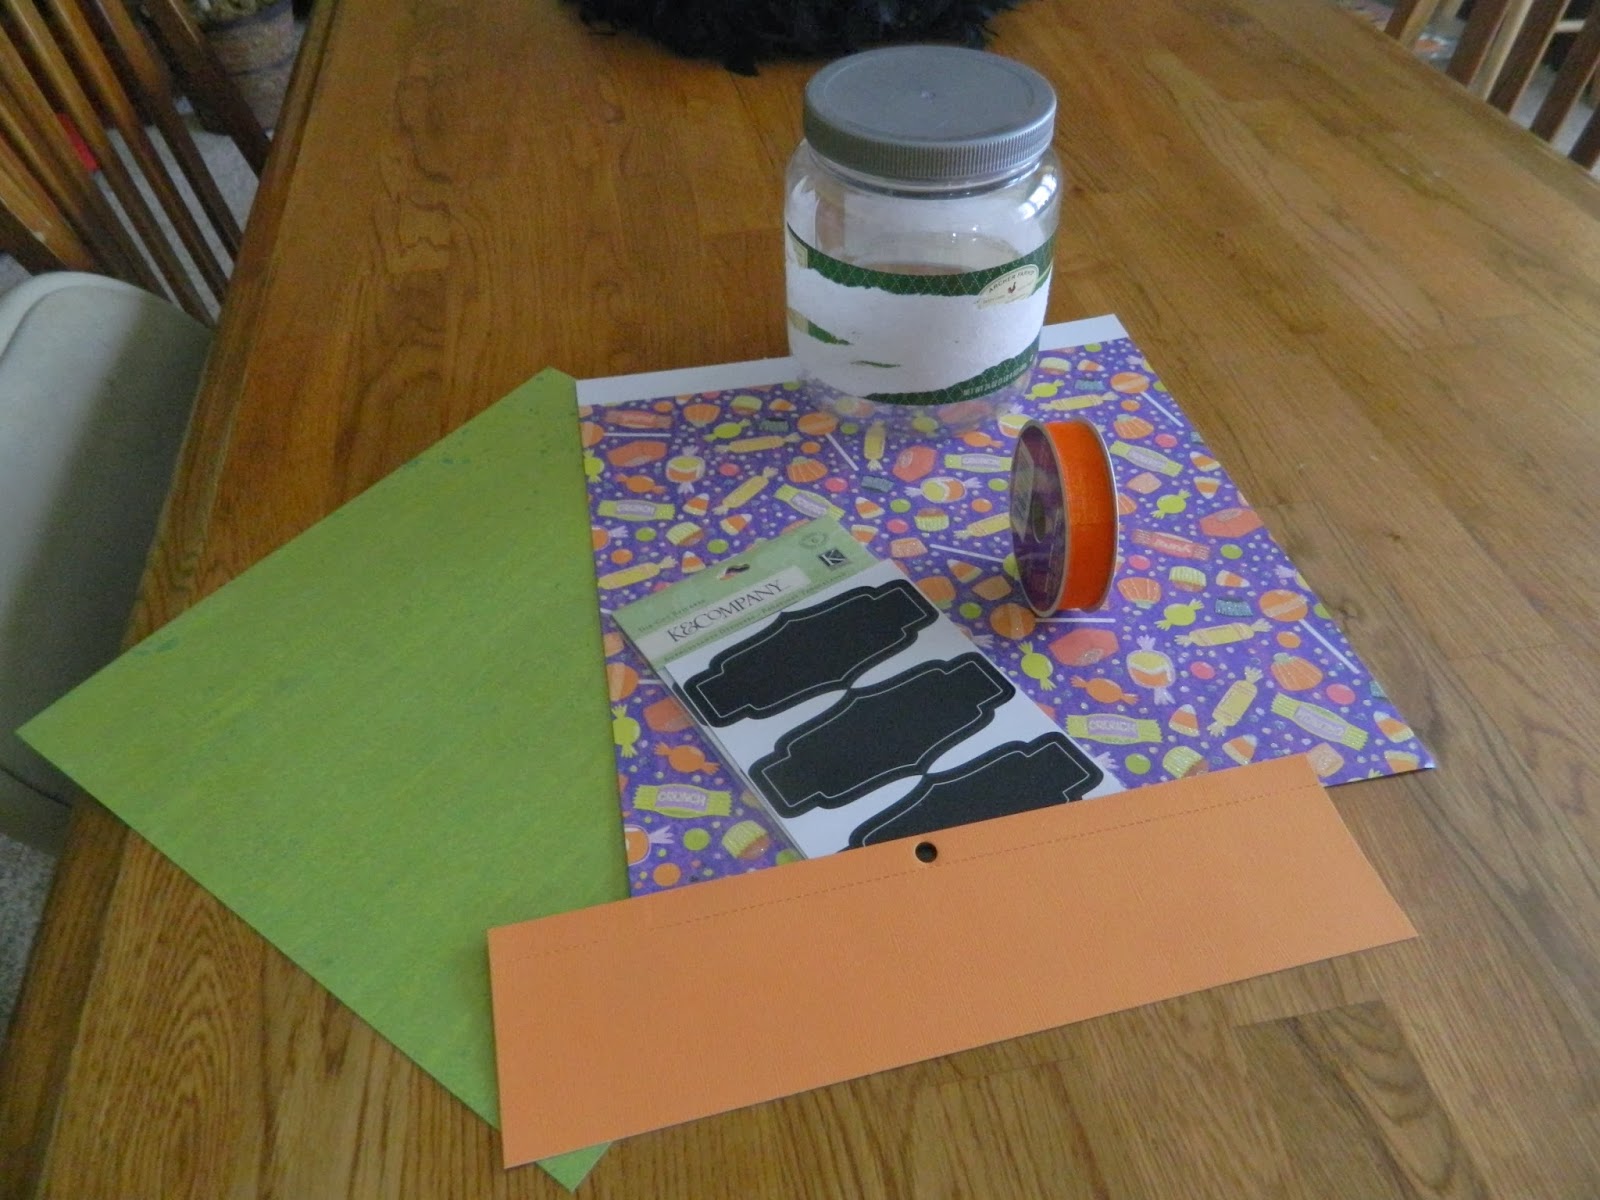
First, I cut the green paper to 3.5 inches and wrapped two pieces so that they went all the way around the jar.
 
 
Next, I cut the candy paper into two strips of 2.75 inches and wrapped those around the jar, staggering the spots where the papers overlap, so it wasn't right next to where the green overlapped.  (Note: the candy paper was very thick and didn't adhere well at first.  I used two rubber bands to help hold the paper in place until the glue had a chance to really take hold.)


I tied the orange ribbon around the mouth of the jar, but not around the edge of the lid.  I know my children, who will be taking the lid off to get to the treats in the jar, and I didn't want to have the ribbon wrecked. 
 
I put the chalkboard sticker on the orange accent paper, and then cut around it free hand to help the chalkboard stand out.  Rather than putting the sticker right on the candy paper, I used Stampin' Up dimensionals (I love those things!) to make it pop even more.


What's great about the chalkboard stamps is that they work! I had to write "Treats" three times before I liked this one, and the chalk erased pretty well each time.


The jar came out so cute, that I may have to do this again with Christmas paper. I'm envisioning teacher presents  - perhaps filled with Candy Cane Oreo Bark.    We'll have to eat a lot of pistachios to each between now and then!


Thursday, October 17, 2013

Witching you...a Haunting Halloween!

I am making Halloween cards this year.

I have several reasons why:

1.  I LOVE Halloween and want to spread the "spirit" (sorry, I couldn't resist).
2. I enjoy making cards.  I like the process of choosing materials and then tinkering with a design until I get it exactly how I want it to look, or even better than I first thought.
3. People like to receive homemade cards.  It puts a little extra "umph" in your message.
4. When we moved earlier this year, I never made "change of address cards" so this is a way to get the information to our friends near and far before the Christmas season starts.
5. Its a good excuse for using up paper, ribbon and other embellishments from the "stash"

My new card design had to meet several requirements. I wanted something to go together very quickly and that would use up "stuff". First, I went to my "Card" board on Pinterest to choose a starting design.  I liked this one by Sue Maddox.  Instead of stamping the four different squares though, I chose two sets of Halloween paper.  There's a bit of glitter in some of them, as I like to have some sparkle in my cards.  Black and orange are traditionally Halloween colors, but I like to throw in some purple and a lime green, which seems to make it more "grown up".


I raided my stash for buttons and brads that would dress things up a bit and also found a spool of Pumpkin Pie ribbon from Stampin' Up.  Looking through my Halloween stamps sets, I chose "Witching you...a haunting Halloween" for the greetings on the front and the inside of the card.
 
 
With black cardstock for the base, and purple for the mat (torn at the bottom)  I was all set.
 
Here are the final products. 


Here's "Witching" you a Happy Halloween!


Tuesday, October 15, 2013

Ghostly Greetings!


This little guy is one of the reasons that I started this challenge for myself.  The pattern was in a Cross Stitch and Needlepoint magazine a few years ago, with many other adorable Halloween charts. First, came the Ghostly Garden stitching, (shown in the last post) and then I gathered up the specialty over dyed threads and sparkling blending filament for the nicely dressed ghost.  But then I saw other stitching patterns, or quilting patterns, or found another book to read, and Mr. Ghost wound up in the bottom of one of my stitching bags.

 For six years. 

Poor little guy.

This summer I brought him out, and finished the stitching section.  Yesterday, after making puzzles and baking cookies with the kids, I took over the dining room table to begin framing.  The original pattern called for three buttons to be added to the stitching: a star in his hat, and a pumpkin and ghost in his hands.   I looked through my stash of scrapbooking supplies, but couldn't find any flat buttons that wouldn't dig into the fabric or the framing board.  So instead, I used three brads, switching out a ghost for a spider.  I cut an opening in a piece of scrapbooking paper for the mat.  The final product is proudly displayed in the living room amidst the paper chains and strings of pumpkin lights.

I'm hoping that with my 40 project challenge, there won't be any other projects stuck in the bottom of a  bag for six years.

Wednesday, October 9, 2013

Halloween Stitchings

Of all types of crafts that I do, I have been a cross stitcher the longest.  I can't draw to save my life, but with a needle and thread, I can create something special.  Whether it's a large elegant piece, like one of Paula Vaughn's patterns, or something quick, cute and whimsical, I love transforming an empty piece of fabric into a work of art.

Years ago when I saw the pattern for this Halloween sampler, I rushed out to find the Kreinik blending filament that glows in the dark so that the moon and stars, ghosts, and the little eyes in the trees would give off an eerie glow.  After sixteen years, it still works!
 
Of course, it wasn't until the stitching was done, in the frame, with the backing glued on that I noticed that it says "Happy Hallowen" instead of Happy Halloween. Whoops!
 
 
This project was originally shown as a stocking.  I didn't know witches left any treats in stockings, but it makes for a cute piece.  I've never made a stocking so instead, I finished it by fraying the Aida cloth, and putting the stitching on top of a piece of scrapbooking paper inside the frame.  I loved the use of sparkly Kreinik blending filaments.


Ghostie's Garden was designed by Cathi Bussi, one of my favorite designers.  I thought Ghostie was very cute and sewed a fabric mat and backing for it. 


This is the most recent of my Halloween stitchings and it happens to be the first one that I signed with my new initials since getting married a year ago.  It still needs a few buttons for embellishment and then to be framed. I'm thinking that I might make a paper mat for this one so that I can mimic the curve at the top.


There are plenty of Halloween patterns in my pattern collection that I would love to do.  We'll see what next Halloween brings!

Tuesday, October 8, 2013

Favorite Halloween Quilts

I love Halloween. I probably have as many Halloween decorations as "normal" people have  Christmas.  I have been collecting witches, pumpkins, and ghosts for years.   I look forward to the strings of orange lights that glow in my windows as the nights begin to lengthen. 

As this weekend was the first in October and we had all four kids at the house, this was our time to decorate. It's our first Halloween as a family in this house, so I had the added fun of figuring out new ways to use my decorations, because they couldn't go where they always have.

I got so caught up in decorating, that the only projects I finished were paper chains of black, purple, and orange (with the kids' help of course) and numerous Perler Bead creations.

 
Since I didn't work on anything new (or rather, something in need of finishing), I thought I'd share some of my favorite Halloween projects with you that I look forward to bringing out each year.
 
 
When I first started quilting, I found a pattern by Debbie Mum that was an apple quilt.  As I was finishing the apple quilt, I came across these fabulous Halloween prints.  By removing the leaves from the sides of stem, I knew that I could adapt the pattern to make perfect pumpkins!  This was machine pieced, hand quilted, with the jack-o-lantern's face appliqued.  I quilted a chain of bats in the border. 

 
The inspiration for this log cabin quilt was actually the flannel that I used for the back.  (I hope I'm not the only one who has ever chosen their backing first!)  I used Halloween prints that I already had, and added some more.  This is machine quilted in-the-ditch through the log cabin section but in the black border I used cookie cutters for patterns to quilt Halloween shapes, like cats, bats, pumpkins and ghosts. The flannel backing is perfect to make the quilt extra cozy for snuggling.  
 
Tomorrow I'll show you some cross stitch favorites, including the one where I spelled Halloween wrong, and didn't realize it until it was in the frame!